| Battle of Tweebosch | |||||||
|---|---|---|---|---|---|---|---|
| Part of Second Boer War | |||||||
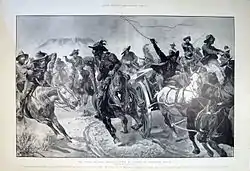
 Contemporary illustration of the defeat of Lord Methuen's force by De la Rey at Tweebosch, March 7, 1902, after a drawing by Richard Caton Woodville | |||||||
| |||||||
| Belligerents | |||||||
|
|
| ||||||
| Commanders and leaders | |||||||
| Lord Methuen | Koos de la Rey | ||||||
| Strength | |||||||
| 1,250 | 2,000 | ||||||
| Casualties and losses | |||||||
| 68 killed, 121 wounded, 205 captured[1] | 51 killed, wounded, missing | ||||||
In the Battle of Tweebosch or De Klipdrift on 7 March 1902, a Boer commando led by Koos de la Rey defeated a British column under the command of Lieutenant General Lord Methuen during the final months of the Second Boer War.
Background
In order to trap the Boer guerrillas in the Orange Free State, Lord Kitchener built lines of blockhouses connected with barbed wire. But there was not enough water in the Western Transvaal to employ the blockhouse system. Instead, he unleashed nine columns to hunt down De la Rey and the other Boer commanders in the area. On 24 February 1902, De la Rey pounced on a wagon convoy commanded by Lieutenant Colonel S. B. Von Donop. For the loss of 51 Boers, De la Rey killed, wounded or captured 12 officers and 369 men.[2] In response, Methuen tried to track the Boer leader down.
Battle

Less than two weeks later, De la Rey ambushed Methuen's column at Tweebosch on the Little Harts River. The British force numbered 1250, including nearly 1000 mounted men and four guns. Methuen's force was largely made up of green troops; these panicked and fled or surrendered. Only the British regulars in the column fought stubbornly in the combat which lasted from dawn until 9:30 am. The British lost 200 killed and wounded, plus 600 men and all four guns captured. After being wounded twice and suffering a broken leg when his horse fell on him, Methuen was captured.[3] He was the only general taken prisoner by the Boers during the war.[2]
Aftermath
De la Rey sent the wounded Methuen to a British hospital in his own carriage under a flag of truce, despite demands from his own troops to execute him. The Boers court-martialed De la Rey for freeing such a valuable prisoner, but after convincing the court that Methuen would withdraw from the war, he was let off.
Upon hearing news of the disaster, a badly shaken Kitchener retired to his bedroom for two days and refused to eat. Recovering his poise, he ordered heavy reinforcements sent to the Western Tranvaal and appointed Colonel Ian Hamilton to coordinate the British effort. On 11 April, one of Hamilton's columns beat the Boers at the Battle of Rooiwal.
The defeat at Tweebosch had far-reaching consequences. In addition to the 68 killed, 121 wounded and 205 captured (including a general), 6 guns had also been taken and the biggest British force in the Western Transvaal neutralised. Questions were asked in parliament as to why Methuen had not been recalled following his defeat at Magersfontein.[1] On the Boer side, there was a feeling that an honourable end could be found to the war.
Metheun escaped with his career intact, with the War Office and Kitchener taking the brunt of criticism for providing him with green troops.[1] On 9 April, Boer and British delegations convened to discuss a negotiated surrender, which was signed on 31 May.
References
- Evans, Martin Marix. The Boer War: South Africa 1899–1902. Oxford: Osprey, 1999. ISBN 1-85532-851-8
- Pakenham, Thomas. The Boer War. New York: Avon Books, 1979. ISBN 0-380-72001-9
- Stephen M. Miller (1999). Lord Methuen and the British Army. Routledge. ISBN 0-7146-4904-X.